Translate

Saturday, September 21, 2013

Android App Development 201 5th tutorial; Consuming Web Service in Android: A Dictionary App!

In this tutorial we will look at how we can consume a SOAP based web service in android. Since android doesn't natively support SOAP protocol, we have to create custom functions that generates the request message dynamically and parses the response message to valuable content we are looking for. For this tutorial we will consume a Dictionary web service located here. We analyze the wsdl first to understand what are the functions available and how the request and response message look like. To analyze the WSDL we go to http://wsdlbrowser.com/. We will then enter the WSDL URL(http://services.aonaware.com/DictService/DictService.asmx?WSDL) and click on Browse. All the functions available will be listed in the left. The function we are interested in is the "define" function. When we click on the define function, it opens a page with editable request xml which allows us to enter a word and call the funtion. Here is the screenshot of how it looks like when we call a function with a word.
We will write a utility class that will have a method which returns us the request xml document with the word we are interested in. Here is how this method looks like
 
        @Override
 public Document generateRequestXml(String word) throws ParserConfigurationException {
  // TODO Auto-generated method stub
  Document document = DocumentBuilderFactory.newInstance().newDocumentBuilder().newDocument();
  document.setXmlVersion("1.0");
  Element rootElement = document.createElement("SOAP-ENV:Envelope");
  rootElement.setAttribute("xmlns:SOAP-ENV", "http://schemas.xmlsoap.org/soap/envelope/");
  rootElement.setAttribute("xmlns:ns1", "http://services.aonaware.com/webservices/");
  Element firstNode = document.createElement("SOAP-ENV:Body");
  Element secondNode = document.createElement("ns1:Define");
  Element thirdNode = document.createElement("ns1:word");
  thirdNode.setTextContent(word);
  secondNode.appendChild(thirdNode);
  firstNode.appendChild(secondNode);
  rootElement.appendChild(firstNode);
  document.appendChild(rootElement);
  
  return document;
 }
As you can see the method takes a string parameter word which is populated in the right xml tag "ns1:word". When we look at the response message, we can see that the definations are populated in "WordDefination" element. So we will write another method in our utility class, which takes HttpResponse object as a parameter and gets all the values populated in this tag and puts them in an ArrayList of Strings.
@Override
 public ArrayList< string > generateWordDefination(HttpResponse response) throws IllegalStateException, IOException, SAXException, ParserConfigurationException {
  HttpEntity entity = response.getEntity();
  InputStream is = entity.getContent();
  BufferedReader br = new BufferedReader(new InputStreamReader(is));
  StringBuffer sb = new StringBuffer();
  String line = "";
  while ((line=br.readLine())!=null) {
  sb.append(line);
  }
  Document responseXml = DocumentBuilderFactory.newInstance().newDocumentBuilder().parse(new InputSource(new StringReader(sb.toString())));
  NodeList nl = responseXml.getElementsByTagName("WordDefinition");
  ArrayList< string > definitions = new ArrayList< string >();
  for(int i=0 ; i < nl.getLength(); i++) {
  definitions.add(nl.item(i).getTextContent());
  }
  System.out.println(sb.toString());
  return definitions;
 }

Next We need to create a user interface to access the dictionary. We will have a simple EditText widget where the users will be able to enter the desired word to search, We will have a search button which triggers the web service call and generates the word definations and then we will have a listview which will be populated with the list of definations. Here is how the layout looks like:
Here is the layout code


<RelativeLayout xmlns:android="http://schemas.android.com/apk/res/android"

    xmlns:tools="http://schemas.android.com/tools"

    android:layout_width="match_parent"

    android:layout_height="match_parent"

    android:paddingBottom="@dimen/activity_vertical_margin"

    android:paddingLeft="@dimen/activity_horizontal_margin"

    android:paddingRight="@dimen/activity_horizontal_margin"

    android:paddingTop="@dimen/activity_vertical_margin"

    tools:context=".MainActivity" >


    <EditText

        android:id="@+id/editText1"

        android:layout_width="wrap_content"

        android:layout_height="wrap_content"

        android:layout_alignParentLeft="true"

        android:layout_alignParentTop="true"

        android:layout_marginTop="15dp"

        android:ems="10"

        android:hint="Type the word" />


    <Button

        android:id="@+id/button1"

        style="?android:attr/buttonStyleSmall"

        android:layout_width="wrap_content"

        android:layout_height="wrap_content"

        android:layout_alignBottom="@+id/editText1"

        android:layout_alignParentRight="true"

        android:text="Search" />


    <ListView

        android:id="@+id/listView1"

        android:layout_width="match_parent"

        android:layout_height="wrap_content"

        android:layout_alignRight="@+id/button1"

        android:layout_below="@+id/editText1" >


    </ListView>


</RelativeLayout>


The last thing we need is a Activity class which triggers the web service call in the OnClick method of the search button. The web service will be called from an AsyncTask subclass within our Activity class. Once the word definations are obtained they are populated into the listview in the onPostExecute() method of the AsyncTask. Here is our Activity Class.
package com.peshal.dictionarywebservicetest;

import java.io.BufferedReader;
import java.io.IOException;
import java.io.InputStream;
import java.io.InputStreamReader;
import java.io.StringWriter;
import java.util.ArrayList;

import javax.xml.parsers.ParserConfigurationException;
import javax.xml.transform.Source;
import javax.xml.transform.Transformer;
import javax.xml.transform.TransformerException;
import javax.xml.transform.TransformerFactory;
import javax.xml.transform.dom.DOMSource;
import javax.xml.transform.stream.StreamResult;

import org.apache.http.HttpEntity;
import org.apache.http.HttpResponse;
import org.apache.http.client.ClientProtocolException;
import org.apache.http.client.HttpClient;
import org.apache.http.client.methods.HttpPost;
import org.apache.http.entity.StringEntity;
import org.apache.http.impl.client.DefaultHttpClient;
import org.w3c.dom.Document;
import org.xml.sax.SAXException;

import android.app.Activity;
import android.os.AsyncTask;
import android.os.Bundle;
import android.view.View;
import android.view.View.OnClickListener;
import android.widget.ArrayAdapter;
import android.widget.Button;
import android.widget.EditText;
import android.widget.ListView;

import com.peshal.utility.impl.DictionaryXmlGeneratorImpl;

public class MainActivity extends Activity {

 @Override
 protected void onCreate(Bundle savedInstanceState) {
  super.onCreate(savedInstanceState);
  setContentView(R.layout.activity_main);
  final Button button = (Button) findViewById(R.id.button1);
  final EditText word = (EditText) findViewById(R.id.editText1);
  
  
  button.setOnClickListener(new OnClickListener(){

   @Override
   public void onClick(View v) {
    System.out.println(word.getText().toString());
    new WebServiceCall().execute(word.getText().toString());
    
   }
   
  });
  
 }
class WebServiceCall extends AsyncTask< string,Void,Void > {
DictionaryXmlGeneratorImpl xmlGenerator = new DictionaryXmlGeneratorImpl();
ArrayList< string > definations = new ArrayList< string >();
@Override
protected Void doInBackground(String... params) {
 try {
  System.out.println(params[0]);
  Document req = xmlGenerator.generateRequestXml(params[0]);
  DOMSource requestXml = new DOMSource(req);
  HttpClient client = new DefaultHttpClient();
  HttpPost post = new HttpPost("http://services.aonaware.com/DictService/DictService.asmx");
  Transformer tf = TransformerFactory.newInstance().newTransformer();
   StringWriter writer = new StringWriter();
         StreamResult result = new StreamResult(writer);
  tf.transform((Source) requestXml, result);
  StringEntity se = new StringEntity(writer.toString());
  se.setContentType("text/xml");
  System.out.println("Request XML is : " +writer.toString() );
  post.setEntity(se);
  HttpResponse httpResponse = client.execute(post);
  definations = xmlGenerator.generateWordDefination(httpResponse);
  
 } catch (ParserConfigurationException e) {
  // TODO Auto-generated catch block
  e.printStackTrace();
 } catch (ClientProtocolException e) {
  // TODO Auto-generated catch block
  e.printStackTrace();
 } catch (IOException e) {
  // TODO Auto-generated catch block
  e.printStackTrace();
 } catch (TransformerException e) {
  // TODO Auto-generated catch block
  e.printStackTrace();
 } catch (IllegalStateException e) {
  // TODO Auto-generated catch block
  e.printStackTrace();
 } catch (SAXException e) {
  // TODO Auto-generated catch block
  e.printStackTrace();
 }
 return null;
}
@Override
protected void onPostExecute(Void result) {
 final ListView listOfWords = (ListView) findViewById(R.id.listView1);
 ArrayAdapter< string > adapter = new ArrayAdapter< string >(MainActivity.this, android.R.layout.simple_list_item_1, definations);
 listOfWords.setAdapter(adapter);
 super.onPostExecute(result);
} 
}
}

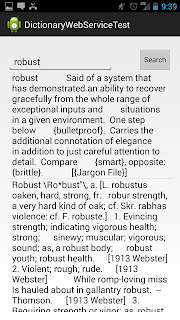
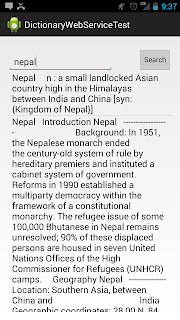
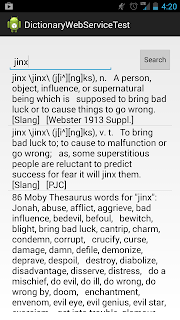
As you can see, we use Android native Apache HttpClient to trigger a HTTP POST request with XML payload, The response xml is read as an InputStream into String Buffer which is then converted to DOM document. This document is then scanned for the element "WordDefinition" to read all the definitions into an ArrayList of String. This ArrayList is then added to ListAdapter to populate the word definitions into the ListView. Here is the screenshot of the resulting application.
Tuesday, July 30, 2013

Android App Development 201 4th tutorial; Android and Custom ListViews

In this tutorial, we will take a look at Custom ListViews in android. Android offers several default listviews, however those are not sufficient to achieve custom design. We will create a simple custom listview. Every ListItem row in our listview will have an ImageView and a TextView. The views can be added by adding new items in our custom list item layout. For this project we will have an Activity where ListView is shown and a class that extends BaseAdapter where out list items are inflated. For the images we will use some default android media drawables and the TextView will show the name of the drawable. We will make two arrays containing these item. We will have two layouts, one for the Activity with ListView and another for the ListItem. Here are the layouts

activity_main.xml

<LinearLayout xmlns:android="http://schemas.android.com/apk/res/android"
    android:layout_width="match_parent"
    android:layout_height="match_parent"
    android:orientation="vertical"
  >


<ListView
    android:id="@+id/listview"
    android:layout_height="wrap_content"
    android:layout_width="match_parent"
/>
</LinearLayout>

listviewitems.xml


<?xml version="1.0" encoding="utf-8"?> 
<RelativeLayout
    android:id="@+id/relativeLayout1"
    android:layout_width="fill_parent"
    android:layout_height="fill_parent"
    xmlns:android="http://schemas.android.com/apk/res/android"
    android:padding="5dip">
   
    <ImageView
        android:id="@+id/image"
        android:layout_width="wrap_content"
        android:layout_height="wrap_content"
        android:layout_alignParentLeft="true"
        android:layout_centerInParent="true"
        android:layout_marginLeft="5dip"
        android:layout_marginRight="5dip"
        android:scaleType="centerInside">
    </ImageView>
   
    <TextView
        android:textAppearance="?android:attr/textAppearanceLarge"
        android:layout_height="wrap_content"
        android:layout_width="wrap_content"
        android:id="@+id/textView"
    android:layout_toRightOf="@+id/image"
        android:layout_marginRight="5dip">
    </TextView>
     

</RelativeLayout>

As you can see the list item layout contains out ImageView and TextView for each list item in the ListView and the main layout has a ListView.

MainActivity.java

package com.peshal.customlistviewtest;


import java.util.ArrayList;
import java.util.List;
import android.os.Bundle;
import android.widget.ListView;
import android.app.Activity;

public class MainActivity extends Activity {

int cnt=0;
@Override
protected void onCreate(Bundle savedInstanceState) {
super.onCreate(savedInstanceState);
setContentView(R.layout.activity_main);
ListView lv = (ListView)findViewById(R.id.listview);
List<ListViewItems> items = new ArrayList<MainActivity.ListViewItems>();
final String[] texts = {"play", "pause", "previous", "next",  "forward", "rewind"};
final int[] resourceColl = {android.R.drawable.ic_media_play, android.R.drawable.ic_media_pause, android.R.drawable.ic_media_previous, android.R.drawable.ic_media_next, android.R.drawable.ic_media_ff, android.R.drawable.ic_media_rew};
while(cnt<texts.length) {
items.add(new ListViewItems(){{
bitmap = resourceColl[cnt];
text = texts[cnt];
cnt++;
}});
}
cnt=0;
CustomListViewAdapter adapter = new CustomListViewAdapter(this, items);
lv.setAdapter(adapter);

}
class ListViewItems {
public int bitmap;
public String text;
}


}


CustomListViewAdapter.java

package com.peshal.customlistviewtest;

import java.util.List;

import com.peshal.customlistviewtest.MainActivity.ListViewItems;

import android.app.Activity;
import android.content.Context;
import android.view.LayoutInflater;
import android.view.View;
import android.view.ViewGroup;
import android.widget.BaseAdapter;
import android.widget.ImageView;
import android.widget.TextView;


public class CustomListViewAdapter extends BaseAdapter
{

LayoutInflater inflater;
List<ListViewItems> items;

    public CustomListViewAdapter(Activity context, List<ListViewItems> items) {
        super();

        this.items = items;
        this.inflater = (LayoutInflater)context.getSystemService(Context.LAYOUT_INFLATER_SERVICE);
    }
 
    @Override
    public int getCount() {
        return items.size();
    }

    @Override
    public Object getItem(int position) {
        return null;
    }

    @Override
    public long getItemId(int position) {
        return 0;
    }
   
    @Override
    public View getView(final int position, View convertView, ViewGroup parent) {
    ListViewItems item = items.get(position);
    View vi=convertView;
       
        if(convertView==null)
            vi = inflater.inflate(R.layout.listviewitems, null);
         
        ImageView imgView = (ImageView)vi.findViewById(R.id.image);
        TextView textView = (TextView)vi.findViewById(R.id.textView);

        imgView.setImageResource(item.bitmap);
        textView.setText(item.text);
        return vi;
    }

}


Saturday, June 29, 2013

Android App Development 201 3nd tutorial; Android and SQLite, CREATE, INSERT and SELECT

In this tutorial we will look at how SQLite can be used in Android application to persist and retrieve data. We will make a simple Login and Register form. Register form will have several fields. Once the user is registered, the registration information is stored in SQLite database and the user can now log in using the credentials used during registration. When logged in we will simply show a dialog with user informations retrieved from the database.


Here is the form layout:

activity_main.xml

<LinearLayout xmlns:android="http://schemas.android.com/apk/res/android"
    android:layout_width="fill_parent"
    android:layout_height="fill_parent"
    android:orientation="vertical"
    android:gravity="center_vertical"
    android:layout_marginLeft="20dp"
    android:layout_marginRight="20dp" >

    <EditText
        android:id="@+id/firstName"
        android:layout_width="match_parent"
        android:layout_height="wrap_content"
        android:hint="First Name"
        android:ems="10"
        android:inputType="textPersonName" >

        <requestFocus />
    </EditText>

    <EditText
        android:id="@+id/lastName"
        android:layout_width="match_parent"
         android:hint="Last Name"
        android:layout_height="wrap_content"
        android:ems="10"
        android:inputType="textPersonName" />

    <EditText
        android:id="@+id/email"
        android:layout_width="match_parent"
        android:layout_height="wrap_content"
        android:hint="Email Address"
        android:ems="10"
        android:inputType="textPersonName" />

    <EditText
        android:id="@+id/phone"
        android:layout_width="match_parent"
        android:layout_height="wrap_content"
        android:hint="Phone Number"
        android:ems="10"
        android:inputType="textPersonName" />

    <EditText
        android:id="@+id/userName"
        android:layout_width="match_parent"
        android:layout_height="wrap_content"
         android:hint="Username"
        android:ems="10"
        android:inputType="textPersonName" />

    <EditText
        android:id="@+id/password"
        android:layout_width="match_parent"
        android:layout_height="wrap_content"
        android:hint="Password"
        android:ems="10"
        android:inputType="textPassword" />

    <LinearLayout
        android:layout_width="match_parent"
        android:layout_height="wrap_content" >

        <Button
            android:id="@+id/login"
            android:layout_width="wrap_content"
            android:layout_height="wrap_content"
            android:layout_weight="0.5"
            android:text="Login" />

        <Button
            android:id="@+id/register"
            android:layout_width="wrap_content"
            android:layout_height="wrap_content"
            android:layout_weight="0.5"
            android:text="Register" />

    </LinearLayout>

    <Button
        android:id="@+id/submit"
        android:layout_width="wrap_content"
        android:layout_height="wrap_content"
        android:layout_gravity="center"
        android:text="Submit" />

</LinearLayout>

We have three different classes, An activity where the layout in inflated, A model Class with getters and setters for form elements and DatabaseConnector Class which takes care of creating database, table, inserting data into database and retrieving data from the database.

Here is the model class:

Form.java
 package com.example.sqlliteandloginform;

public class Form {
private String firstName;
private String lastName;
private String email;
private String phoneNumber;
private String username;
private String password;
public String getFirstName() {
return firstName;
}
public void setFirstName(String firstName) {
this.firstName = firstName;
}
public String getLastName() {
return lastName;
}
public void setLastName(String lastName) {
this.lastName = lastName;
}
public String getEmail() {
return email;
}
public void setEmail(String email) {
this.email = email;
}
public String getPhoneNumber() {
return phoneNumber;
}
public void setPhoneNumber(String phoneNumber) {
this.phoneNumber = phoneNumber;
}
public String getUsername() {
return username;
}
public void setUsername(String username) {
this.username = username;
}
public String getPassword() {
return password;
}
public void setPassword(String password) {
this.password = password;
}

}

Here is the DatabaseConnector class:

DatabaseConnector.java

package com.example.sqlliteandloginform;

import java.util.ArrayList;
import java.util.List;

import android.content.Context;
import android.database.Cursor;
import android.database.sqlite.SQLiteDatabase;
import android.database.sqlite.SQLiteOpenHelper;
import android.util.Log;

public class DatabaseConnector extends SQLiteOpenHelper {

private static final int Version =1;
private static final String firstName="FIRST_NAME";
private static final String lastName="LAST_NAME";
private static final String email="EMAIL";
private static final String phoneNumber="PHONE_NUMBER";
private static final String username="USERNAME";
private static final String password="PASSWORD";
private static final String databaseName="FORM";
private static final String tableName="USER_RECORDS";
private static final String id = "ID";

public DatabaseConnector(Context context) {
super(context, databaseName, null, Version);

}

@Override
public void onCreate(SQLiteDatabase database) {
String createTableSQL = "CREATE TABLE " + tableName + " (" + id +" INTEGER NOT NULL PRIMARY KEY, " + firstName +" TEXT, " + lastName
+ " TEXT, " +email + " TEXT, " + phoneNumber + " TEXT, " + username + " TEXT, " + password + " TEXT)";
Log.d("onCreate()", createTableSQL);
database.execSQL(createTableSQL);

}

@Override
public void onUpgrade(SQLiteDatabase database, int arg1, int arg2) {

}

public void addRecord(String firstname, String lastname, String emailAddress, String phone, String uname, String pword ) {
String insertSQL = "INSERT INTO " + tableName + " (" + firstName + ", " + lastName + " ," + email + " ," + phoneNumber + " ," + username + " ," + password + ") "
+ "VALUES" + " ('" + firstname + "', '" + lastname + "', '" + emailAddress + "', '" + phone + "', '" + uname + "', '" + pword + "')" ;
Log.d("addRecord()", insertSQL);
SQLiteDatabase dataBase = this.getWritableDatabase();
dataBase.execSQL(insertSQL);
dataBase.close();
}

public List<String> getRecord(String uname, String pword) {
List<String> recordList = new ArrayList<String>();
SQLiteDatabase dataBase = this.getReadableDatabase();
String getSQL = "SELECT * FROM " + tableName + " WHERE " + username + " = '" + uname + "' AND " + password + " = '" + pword + "'";
Cursor cursor = dataBase.rawQuery(getSQL , null);
Log.d("getRecord()", getSQL + "##Count = " + cursor.getCount());
cursor.moveToFirst();
String fName = cursor.getString(1);
String lName = cursor.getString(2);
String eMail = cursor.getString(3);
String ph = cursor.getString(4);
Log.d("getRecord()", "FirstName: " + fName + "LastName: " + lName + "Email: " + eMail + "Phone" + ph);
recordList.add(fName);
recordList.add(lName);
recordList.add(eMail);
recordList.add(ph);
dataBase.close();
return recordList;

}


}

This class has four different methods, onCreate() is where we create our table with a simple CREATE SQL statement. We are not implementing onUpgrade(). addRecord() is responsible to enter new registration data into the table using SQL INSERT statement and getRecord() is responsible to retrieve the data from the table and return a List with the user information.

Here is our Activity Class:

MainActivity.java


package com.example.sqlliteandloginform;


import java.util.List;


import android.os.Bundle;
import android.app.Activity;
import android.app.Dialog;
import android.util.Log;
import android.view.View;
import android.view.View.OnClickListener;
import android.widget.Button;
import android.widget.EditText;
import android.widget.TextView;
import android.widget.Toast;


public class MainActivity extends Activity {
DatabaseConnector dConnector = new DatabaseConnector(this);
Form form = new Form();
@Override
protected void onCreate(Bundle savedInstanceState) {
super.onCreate(savedInstanceState);
setContentView(R.layout.activity_main);


final EditText firstName = (EditText) findViewById(R.id.firstName);
final EditText lastName = (EditText) findViewById(R.id.lastName);
final EditText email = (EditText) findViewById(R.id.email);
final EditText phoneNumber = (EditText) findViewById(R.id.phone);
final EditText username = (EditText) findViewById(R.id.userName);
final EditText password = (EditText) findViewById(R.id.password);

final Button register = (Button)findViewById(R.id.register);
final Button login = (Button) findViewById(R.id.login);
final Button submit = (Button) findViewById(R.id.submit);

firstName.setVisibility(View.GONE);
lastName.setVisibility(View.GONE);
email.setVisibility(View.GONE);
phoneNumber.setVisibility(View.GONE);
submit.setVisibility(View.GONE);
register.setOnClickListener(new OnClickListener(){


@Override
public void onClick(View view) {
firstName.setVisibility(View.VISIBLE);
lastName.setVisibility(View.VISIBLE);
email.setVisibility(View.VISIBLE);
phoneNumber.setVisibility(View.VISIBLE);
login.setVisibility(View.GONE);
register.setVisibility(View.GONE);
submit.setVisibility(View.VISIBLE);
}

});
login.setOnClickListener(new OnClickListener(){


@Override
public void onClick(View view) {
try {
List<String> userRecord = dConnector.getRecord(username.getEditableText().toString(), password.getEditableText().toString());
Log.d("Login onClick()", String.valueOf(userRecord.size()));
Dialog dialog = new Dialog(view.getContext());
TextView tv = new TextView(getApplicationContext());
tv.setText("First Name : " + userRecord.get(0) +" \n" + "Last Name : " + userRecord.get(1) + "\n" + "Email : " + userRecord.get(2)
+ "\n" + "Phone : " + userRecord.get(3));
dialog.setContentView(tv);
dialog.setTitle("User Details");
dialog.show();
dialog.setCanceledOnTouchOutside(true);
}

catch (Exception e) {
Toast.makeText(getApplicationContext(), "Login Failed, Record Not Found", Toast.LENGTH_SHORT).show();
e.printStackTrace();
}

}

});
submit.setOnClickListener(new OnClickListener(){


@Override
public void onClick(View view) {
form.setFirstName(firstName.getEditableText().toString());
form.setLastName(lastName.getEditableText().toString());
form.setEmail(email.getEditableText().toString());
form.setPhoneNumber(phoneNumber.getEditableText().toString());
form.setUsername(username.getEditableText().toString());
form.setPassword(password.getEditableText().toString());
dConnector.addRecord(form.getFirstName(), form.getLastName(), form.getEmail(), form.getPhoneNumber(), form.getUsername(), form.getPassword());
Toast.makeText(getApplicationContext(), "Record Added!", Toast.LENGTH_SHORT).show();
firstName.setVisibility(View.GONE);
lastName.setVisibility(View.GONE);
email.setVisibility(View.GONE);
phoneNumber.setVisibility(View.GONE);
submit.setVisibility(View.GONE);
login.setVisibility(View.VISIBLE);
register.setVisibility(View.VISIBLE);
}

});

}


}


This class is responsible for passing data from different EditText fields to the Form and the DatabaseController to perform SQL operations. Complete source code for this project is available here.


Saturday, May 18, 2013

Android App Development 201 2nd tutorial; JSON parsing from a url and populating ListView in Android

In this tutorial, we will look at parsing JSON from a url. We will take a Flickr jsonfeed for this project. This feed can be located here. This JSON feed contains a JSON array called "items". Remember JSON array always starts with [ bracket. and the objects are enclosed in { bracket. Each object can have various name value pair. For this example we will be looking at the 'title' and 'link' names and get their values in an ArrayList. We will then populate our listview with the titles. When we click at the titles, a web view will be shown with the url corresponding to that title.
Lets start with the layouts. We need two of them here one for the main activity where the listview is populated and another for the web view activity where the page corresponding to the title will be displayed.

activity_main.xml


<RelativeLayout xmlns:android="http://schemas.android.com/apk/res/android"
    xmlns:tools="http://schemas.android.com/tools"
    android:layout_width="match_parent"
    android:layout_height="match_parent"
    tools:context=".MainActivity" >

    <ListView
        android:layout_width="match_parent"
        android:layout_height="match_parent"
        android:id="@+id/listView"/>

</RelativeLayout>


web_view.xml


<LinearLayout xmlns:android="http://schemas.android.com/apk/res/android"
    android:layout_width="match_parent"
    android:layout_height="match_parent"
 android:orientation="vertical"
 >

    <WebView
        android:id="@+id/webview"
        android:layout_width="fill_parent"
        android:layout_height="fill_parent"
      />

</LinearLayout>

We will have two activities corresponding these two layouts and a jsonparser class.

MainActivity.java


package com.peshal.jsonfeedtest;

import java.io.IOException;
import java.util.ArrayList;
import java.util.List;

import org.apache.http.client.ClientProtocolException;
import org.json.JSONArray;
import org.json.JSONException;
import org.json.JSONObject;
import android.os.AsyncTask;
import android.os.Bundle;
import android.view.View;
import android.widget.AdapterView;
import android.widget.AdapterView.OnItemClickListener;
import android.widget.ArrayAdapter;
import android.widget.ListView;
import android.app.Activity;
import android.content.Intent;

public class MainActivity extends Activity {
ListView lv;
JSONArray items;
JSONObject jsonObject;
List<String> titleCollection = new ArrayList<String>();
List<String> urlCollection = new ArrayList<String>();
@Override
protected void onCreate(Bundle savedInstanceState) {
super.onCreate(savedInstanceState);
setContentView(R.layout.activity_main);
lv = (ListView) findViewById(R.id.listView);
new NetworkOperation().execute();
lv.setOnItemClickListener(new OnItemClickListener(){

@Override
public void onItemClick(AdapterView<?> arg0, View arg1, int arg2,
long arg3) {
String photoUrl = urlCollection.get(arg2);
Intent webViewIntent = new Intent(MainActivity.this, WebViewActivity.class);
webViewIntent.putExtra("url", photoUrl);
startActivity(webViewIntent);
}

});
}

public void loadContents() {
ArrayAdapter<String> adapter =new ArrayAdapter<String>(getBaseContext(), android.R.layout.simple_list_item_1,titleCollection);
lv.setAdapter(adapter);
}

public class NetworkOperation extends AsyncTask<Void, Void, Void> {

@Override
protected Void doInBackground(Void... arg0) {
JsonParser parser = new JsonParser();

try {
String result = parser.getHttpConnection();
String removedString = result.trim().substring(15, result.trim().length()-1);
JSONObject jsonObject = new JSONObject(removedString);
items = jsonObject.getJSONArray("items");
for (int i = 0; i<items.length(); i++) {
jsonObject = items.getJSONObject(i);
titleCollection.add(jsonObject.getString("title"));
urlCollection.add(jsonObject.getString("link"));
}


} catch (ClientProtocolException e) {
e.printStackTrace();
} catch (IOException e) {
e.printStackTrace();
} catch (JSONException e) {
// TODO Auto-generated catch block
e.printStackTrace();
}
return null;
}


@Override
protected void onPostExecute(Void result) {
loadContents();

super.onPostExecute(result);
}

}

}

NetworkOperation class is used for Asynchronous data loading as android doesnot allow network operations in main thread starting android 2.3 gingerbread. AsyncTask invokes the onPostExecute() method

 when the background task is complete. This is when we will populateour listviews. As you can see in this method we redirect to loadContents() method where we populate our listview.

JsonParser.java

package com.peshal.jsonfeedtest;

import java.io.BufferedReader;
import java.io.IOException;
import java.io.InputStreamReader;
import org.apache.http.HttpResponse;
import org.apache.http.client.ClientProtocolException;
import org.apache.http.client.HttpClient;
import org.apache.http.client.methods.HttpGet;
import org.apache.http.impl.client.DefaultHttpClient;
import org.json.JSONObject;


public class JsonParser {
BufferedReader in = null;
JSONObject jsonObject=null;
String result="";


public String getHttpConnection() throws ClientProtocolException, IOException {
HttpClient httpClient = new DefaultHttpClient();
HttpGet request = new HttpGet("http://www.flickr.com/services/feeds/photos_public.gne?tags=punctuation,atsign&format=json");
HttpResponse response = httpClient.execute(request);
in = new BufferedReader(new InputStreamReader(response.getEntity().getContent()));

StringBuffer sb = new StringBuffer("");
String line="";
String lineSeparator=System.getProperty("line.separator");
while ((line=in.readLine())!=null) {
sb.append(line + lineSeparator);
}
in.close();
result = sb.toString();
try{
jsonObject = new JSONObject(result);
}
catch(Exception e) {
}
return result;

}


}

This class is mainly responsible for making a HTTP GET request to the url where the json feed is located and loading the contents from the page to a string buffer and returns the string. This string is parsed to ArrayList in the doInBackground method of AsyncTask from the MainActivity class. One more note here, the json feed contains some unwanted information which are removed using the substring method.

WebViewActivity

package com.peshal.jsonfeedtest;


import android.os.Bundle;
import android.view.KeyEvent;
import android.view.View;
import android.view.View.OnKeyListener;
import android.webkit.WebView;
import android.webkit.WebViewClient;
import android.app.Activity;

public class WebViewActivity extends Activity {
WebView webView;
@Override
protected void onCreate(Bundle savedInstanceState) {
super.onCreate(savedInstanceState);
setContentView(R.layout.web_view);
    webView = (WebView)findViewById(R.id.webview);
webView.setWebViewClient(new WebViewClient());
String url=getIntent().getExtras().getString("url");
webView.canGoBack();
webView.loadUrl(url);
webView.setOnKeyListener(new OnKeyListener() {

@Override
public boolean onKey(View arg0, int keyCode, KeyEvent event) {
if (keyCode == KeyEvent.KEYCODE_BACK && webView.canGoBack()) {    
webView.goBack();
return true;
}
else {
return false;
}
}
});
}
}

This activity is responsible to load the url corresponding to the title into the web view. The url is passed from MainActivity using Intent.putExtra method. The parameters passed is retrieved in this activity using getIntent().getExtras().getString() method.

Dont forget to add Internet permission in the manifest since we are using the HTTP request as well as webview. Complete source code is available here.

 <uses-permission android:name="android.permission.INTERNET" />


Saturday, March 2, 2013

Android App Development 201 1st tutorial; Android and Web Service, Multi Threading using AsyncTask and More

In this tutorial, we will look at multi threading in android using Async Task as well as how to integrate web service with your android application. We will look at new API's such as location manager to get the location information using the GPS sensor. We will then convert the location information to a Json Object and pass that object to a url using Http POST request. Here is the code:


package com.example.locationtest;

import java.io.IOException;
import java.io.UnsupportedEncodingException;
import java.util.Timer;
import java.util.TimerTask;
import org.apache.http.client.ClientProtocolException;
import org.apache.http.client.HttpClient;
import org.apache.http.client.methods.HttpPost;
import org.apache.http.entity.StringEntity;
import org.apache.http.impl.client.DefaultHttpClient;
import org.json.JSONException;
import org.json.JSONObject;
import android.location.Location;
import android.location.LocationListener;
import android.location.LocationManager;
import android.os.AsyncTask;
import android.os.Bundle;
import android.os.Handler;
import android.view.View;
import android.view.View.OnClickListener;
import android.widget.Button;
import android.widget.EditText;
import android.widget.TextView;
import android.widget.Toast;
import android.app.Activity;
import android.content.Context;
import android.content.Intent;


public class MainActivity extends Activity implements LocationListener{
private TextView textView =null;
LocationManager locationManager=null;
Location location=null;
protected String url;
protected JSONObject jsonData=null;
private EditText urlText=null;

@Override
protected void onCreate(Bundle savedInstanceState) {
super.onCreate(savedInstanceState);
setContentView(R.layout.activity_main);
locationManager = (LocationManager)getSystemService(Context.LOCATION_SERVICE);
final boolean gpsEnabled = locationManager.isProviderEnabled(LocationManager.GPS_PROVIDER);
if(gpsEnabled!=true) {
Toast.makeText(getApplicationContext(), "GPS Disbled! Please Enable to Proceed!", Toast.LENGTH_SHORT).show();
        startActivity(new Intent(android.provider.Settings.ACTION_LOCATION_SOURCE_SETTINGS));
}

textView = (TextView)findViewById(R.id.textView);
locationManager.requestLocationUpdates(LocationManager.GPS_PROVIDER, 0, 1, this);
urlText = (EditText)findViewById(R.id.urlTextbox);
Button submitButton = (Button)findViewById(R.id.submitUrl);

submitButton.setOnClickListener(new OnClickListener() {
@Override
public void onClick(View view) {
if (urlText.getText()!=null) {
url=urlText.getText().toString();
System.out.println(url);//for testing only, not required
Toast.makeText(getApplicationContext(), "Url Submitted, Sending data to Web Service at url: " + url, Toast.LENGTH_SHORT).show();
}
}
});


}

@Override
public void onLocationChanged(final Location location) {
this.location=location;
final Handler handler = new Handler();
 Timer ourtimer = new Timer();
 TimerTask timerTask = new TimerTask() {
 int cnt=1;  
 public void run() {
                 handler.post(new Runnable() {
                         public void run() {
                       
                        Double latitude = location.getLatitude();
                      Double longitude = location.getLongitude();
                      Double altitude = location.getAltitude();
                      Float accuracy = location.getAccuracy();
                      textView.setText("Latitude: " + latitude + "\n" + "Longitude: " + longitude+ "\n" + "Altitude: " + altitude + "\n" + "Accuracy: " + accuracy + "meters"+"\n" + "Location Counter: " + cnt);
                      try {
                      jsonData = new JSONObject();
jsonData.put("Latitude", latitude);
jsonData.put("Longitude", longitude);
jsonData.put("Altitude", altitude);
jsonData.put("Accuracy", accuracy);

System.out.println(jsonData.toString());//not required, for testing only
if(url!=null) {
new HttpPostHandler().execute();
}
} catch (JSONException e) {
// TODO Auto-generated catch block
e.printStackTrace();
}
                     
                      cnt++;
                         }
               
                });
         }};
     ourtimer.schedule(timerTask, 0, 120000);

}

@Override
public void onProviderDisabled(String provider) {


}

@Override
public void onProviderEnabled(String provider) {


}

@Override
public void onStatusChanged(String provider, int status, Bundle extras) {


}


public class HttpPostHandler extends AsyncTask<Void,Void,Void> {

@Override
protected Void doInBackground(Void... arg0) {

HttpClient httpClient = new DefaultHttpClient();
HttpPost httpPost = new HttpPost(url);
StringEntity dataEntity = null;
try {
dataEntity = new StringEntity(jsonData.toString());
} catch (UnsupportedEncodingException e) {
// TODO Auto-generated catch block
e.printStackTrace();
}
httpPost.setEntity(dataEntity);
httpPost.setHeader("Content-Type", "application/json");
try {
httpClient.execute(httpPost);
} catch (ClientProtocolException e) {
// TODO Auto-generated catch block
e.printStackTrace();
} catch (IOException e) {
// TODO Auto-generated catch block
e.printStackTrace();

}
return null;


}

@Override
protected void onPostExecute(Void result) {
// TODO Auto-generated method stub
super.onPostExecute(result);
try {
this.finalize();
} catch (Throwable e) {
// TODO Auto-generated catch block
e.printStackTrace();
}
}

}

}

Here is the layout code:

<LinearLayout xmlns:android="http://schemas.android.com/apk/res/android"
    android:layout_width="match_parent"
    android:layout_height="match_parent"
    android:orientation="vertical" >
 
    <EditText
        android:id="@+id/urlTextbox"
        android:layout_width="match_parent"
        android:layout_height="wrap_content"
        android:hint="Web Service Url"
    android:layout_gravity="top"
        />
    <Button android:id="@+id/submitUrl"
        android:layout_width="wrap_content"
        android:layout_height="wrap_content"
        android:text="Submit"
        android:layout_gravity="right"
/>
 
    <TextView
        android:id="@+id/textView"
        android:layout_width="match_parent"
        android:layout_height="wrap_content"
        android:text=""
        android:layout_gravity="center"/>
 
</LinearLayout>


As you can see in the code, at first it makes sure the GPS is turned or it will launch the activity to the location settings menu. Once it makes sure the GPS is enabled, it starts getting location and displaying them in the textview. Once we enter the url to send the post information in the edit text, it starts sending location information to the url using Http POST. Remember to add following permissions to your android manifest file.

<uses-permission android:name="android.permission.ACCESS_COARSE_LOCATION" />
<uses-permission android:name="android.permission.ACCESS_FINE_LOCATION" />
<uses-permission android:name="android.permission.INTERNET" />

Complete source code is available here


Wednesday, January 9, 2013

Android App Development 101 5th tutorial; Android and Web, Turn your Web Site into an Android App!

In this tutorial, I will be using Android WebView to display my blog in our android app. Web View is very straight forward and offer several features. We will be looking at few of them. At first we need to make a layout in xml with our WebView object, then we will load our url into the layout.

activity_main.xml


<LinearLayout xmlns:android="http://schemas.android.com/apk/res/android"

    android:layout_width="match_parent"
    android:layout_height="match_parent"
 android:orientation="vertical"
 >

    <WebView
        android:id="@+id/webview"
        android:layout_width="fill_parent"
        android:layout_height="fill_parent"
      />

</LinearLayout>


MainActivity.java


package com.example.webview;

import android.os.Bundle;
import android.app.Activity;
import android.view.KeyEvent;
import android.webkit.WebView;
import android.webkit.WebViewClient;

public class MainActivity extends Activity {
WebView ourwebView;
@Override
protected void onCreate(Bundle savedInstanceState) {
super.onCreate(savedInstanceState);
setContentView(R.layout.activity_main);
loadWeb();
}

public void loadWeb() {
WebView webView = (WebView)findViewById(R.id.webview);
ourwebView=webView;
this.setTitle("Android Happenings");
ourwebView.setWebViewClient(new WebViewClient());
String url="http://androidhappenings.blogspot.com/";
ourwebView.canGoBack();
ourwebView.loadUrl(url);

}


public boolean onKeyDown(int keyCode, KeyEvent event) {
if (keyCode==KeyEvent.KEYCODE_BACK && ourwebView.canGoBack()) {
ourwebView.goBack();
return true;

}
return super.onKeyDown(keyCode, event);
}


}

As we can see in the above java code, the onKeyDown method checks for back presses and move our web view one page back in each back press whenever possible. Also make sure that you add internet permission in your manifest or it will display web page not found error.
<uses-permission android:name="android.permission.INTERNET" />


Sunday, January 6, 2013

Android App Development 101 4th tutorial; Developing Android StopWatch/Timer

In this tutorial, i will be making a stop watch for android. We will create a text view to display the time elapsed and two buttons one to start the timer and second to stop the timer. We will be using more xml attributes and new java concepts such as runnables and handlers. In addition we will be using android Timer class. Here is our layout:

main.xml


<LinearLayout xmlns:android="http://schemas.android.com/apk/res/android"

    android:layout_width="fill_parent"
    android:layout_height="fill_parent"
    android:orientation="vertical" >

      <TextView
        android:id="@+id/androidtimer"
        android:layout_width="fill_parent"
        android:layout_height="wrap_content"
        android:gravity="center"
        android:text="Android Timer"
        android:textSize="40sp"
        android:textStyle="bold"
        android:textColor="#FF0000"/>
   
    <LinearLayout
        android:layout_width="match_parent"
    android:layout_height="match_parent"
    android:orientation="horizontal"
    android:gravity="bottom|center" >
    <Button
        android:id="@+id/start"
        android:layout_width="wrap_content"
        android:layout_height="wrap_content"
        android:background="#FF0000"
        android:text=" start "
        android:textSize="35sp"
        android:textColor="#FFFFFF"
        android:onClick="startTimer"
/>
    <View
        android:layout_width="20dp"
        android:layout_height="1dp"/>
       <Button
        android:id="@+id/stop"
        android:layout_width="wrap_content"
        android:layout_height="wrap_content"
        android:background="#FF0000"
        android:text=" stop "
        android:textSize="35sp"
        android:textColor="#FFFFFF"
        android:onClick="stopTimer"
       
/>
       </LinearLayout>
</LinearLayout>

The View objects are used just to create some space between two buttons. Also you can see that we have used a new linear layout within a linear layout to display two buttons in a horizontal row.

TimerActivity.java


package com.example.timer;

import java.util.Timer;
import java.util.TimerTask;
import android.os.Bundle;
import android.os.Handler;
import android.app.Activity;
import android.view.View;
import android.widget.TextView;

public class TimerActivity extends Activity {
TimerTask timerTask;
int n=0;
@Override
protected void onCreate(Bundle savedInstanceState) {
super.onCreate(savedInstanceState);
setContentView(R.layout.main);
}

public void startTimer(View view) {
final Handler handler = new Handler();
Timer ourtimer = new Timer();
timerTask = new TimerTask() {
       public void run() {
               handler.post(new Runnable() {
                       public void run() {
                  TextView timer = (TextView)findViewById(R.id.androidtimer);
               
                  timer.setText(n + " Seconds");
                      n++;
                       }
              });
       }};


   ourtimer.schedule(timerTask, 0, 1000);

}
public void stopTimer(View view) {
timerTask.cancel();
timerTask=null;
n=0;
}

}